Whether you manage a product line of branded merchandise, operate an e-commerce store, or buy pins in bulk for retail, you know the sting all too well: a beautiful lapel pin arrives damaged, or a customer reports a broken post after just a few days of wear. It happens more often than anyone would like — and when it does, knowing how to fix a lapel pin (instead of immediately writing it off) can save your business real money.
This guide walks you through every common pin problem you’re likely to encounter — from snapped posts to surface scratches — and gives you practical, step-by-step solutions. We’ll also cover how to keep pins from falling off in the first place, so you can protect your inventory and your customers’ confidence in your brand.
Common Lapel Pin Problems
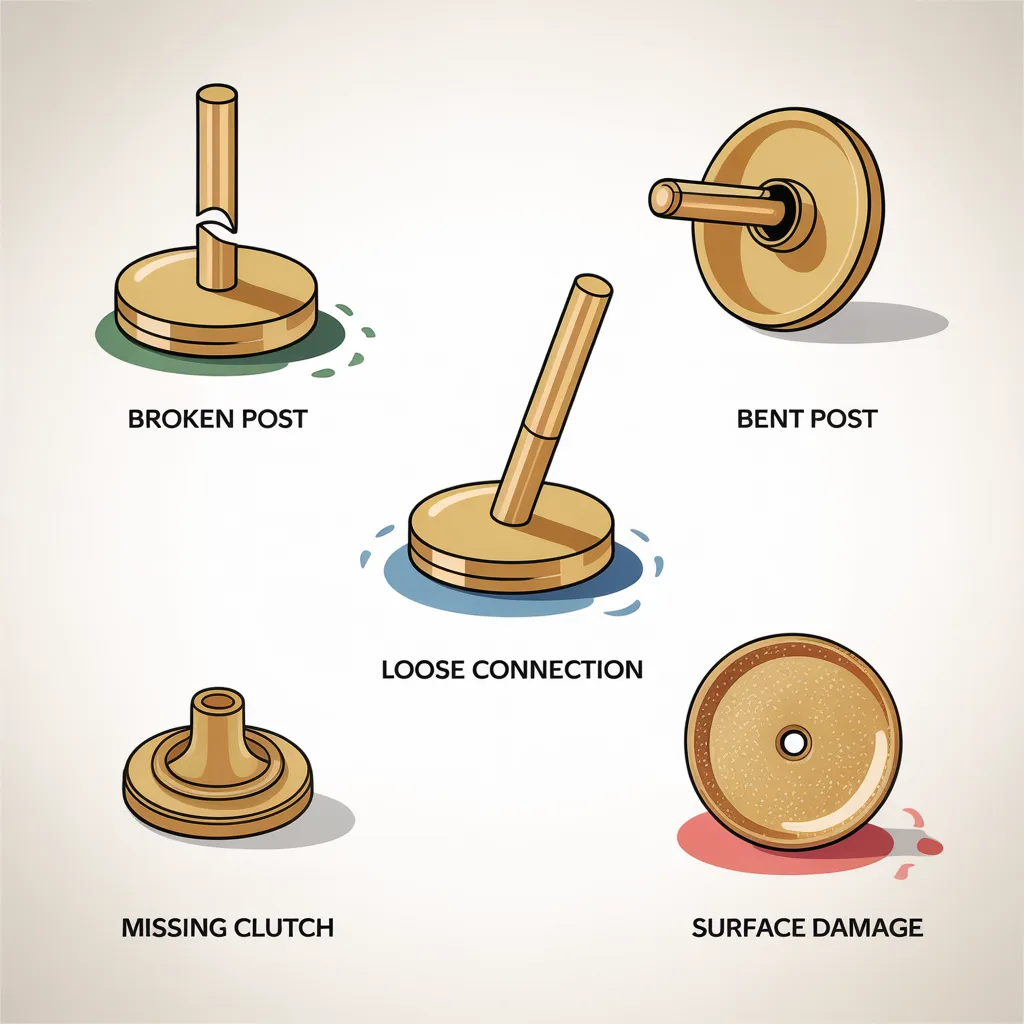
Before you reach for the glue, it helps to understand what went wrong. Here are the most frequent issues retailers and brand managers encounter:
- Broken or snapped post: Usually caused by impact during shipping or aggressive handling. This is the most reported issue in bulk pin orders.
- Bent post: Often a transit issue — pins shift inside packaging and the thin post gets bent under pressure. Frequently mistaken for a manufacturing defect.
- Loose or wobbly post: Happens when the adhesive between the post and the pin body weakens over time, especially common in die-cast zinc alloy pins.
- Worn-out or lost clutch/backing: Rubber clutches degrade faster than metal ones and can lose their grip after repeated use.
- Surface damage: Scratches, tarnishing, oxidation, and discoloration — usually the result of poor storage conditions, humidity, or chemical exposure.
Know Your Pin Type Before You Start Repairs
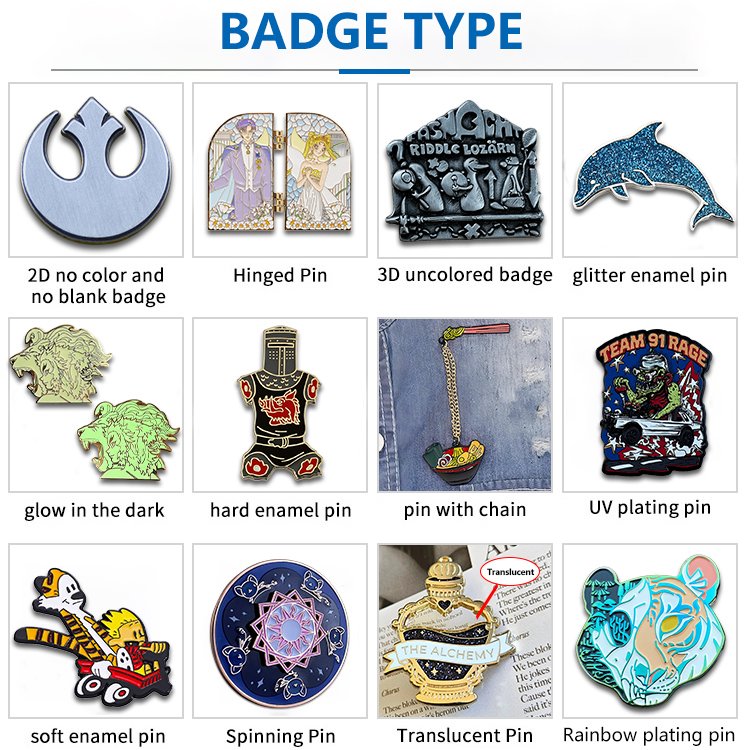
Not all lapel pins are built the same, and repair options vary depending on the manufacturing method. Here’s a quick reference:
| Pin Type | How Post Is Attached | Post-Production Repair Option |
| Die-Cast (Zinc Alloy) | Embedded in mold OR glued | Glue only |
| Die-Struck (Brass/Copper/Iron) | Soldered OR glued | Glue only (soldering damages finish) |
| Photo Dome (Stainless Steel) | Spot welded OR glued | Glue only (welding damages print) |
| Soft Enamel | Glued | Glue + clutch replacement |
| Hard Enamel / Sandblast Enamel Pin | Glued | Glue + polish/wax maintenance |
One important note: for die-struck, die-cast, and photo dome pins, the original factory methods (soldering, welding, mold embedding) cannot be replicated at home after production without risking damage to the plating or color fill. Gluing is the only safe post-production repair method — and the good news is that, with the right adhesive, it works well.
A special mention for the sandblast enamel pin: this style features a matte, textured metal surface achieved through sandblasting before enamel filling. It gives the pin a premium, understated look that’s popular with upscale brands — but it also means the surface is slightly more porous. Use non-reactive adhesives and gentle cleaning solutions to avoid marking the finish.
How to Fix a Broken Pin Post — Step by Step
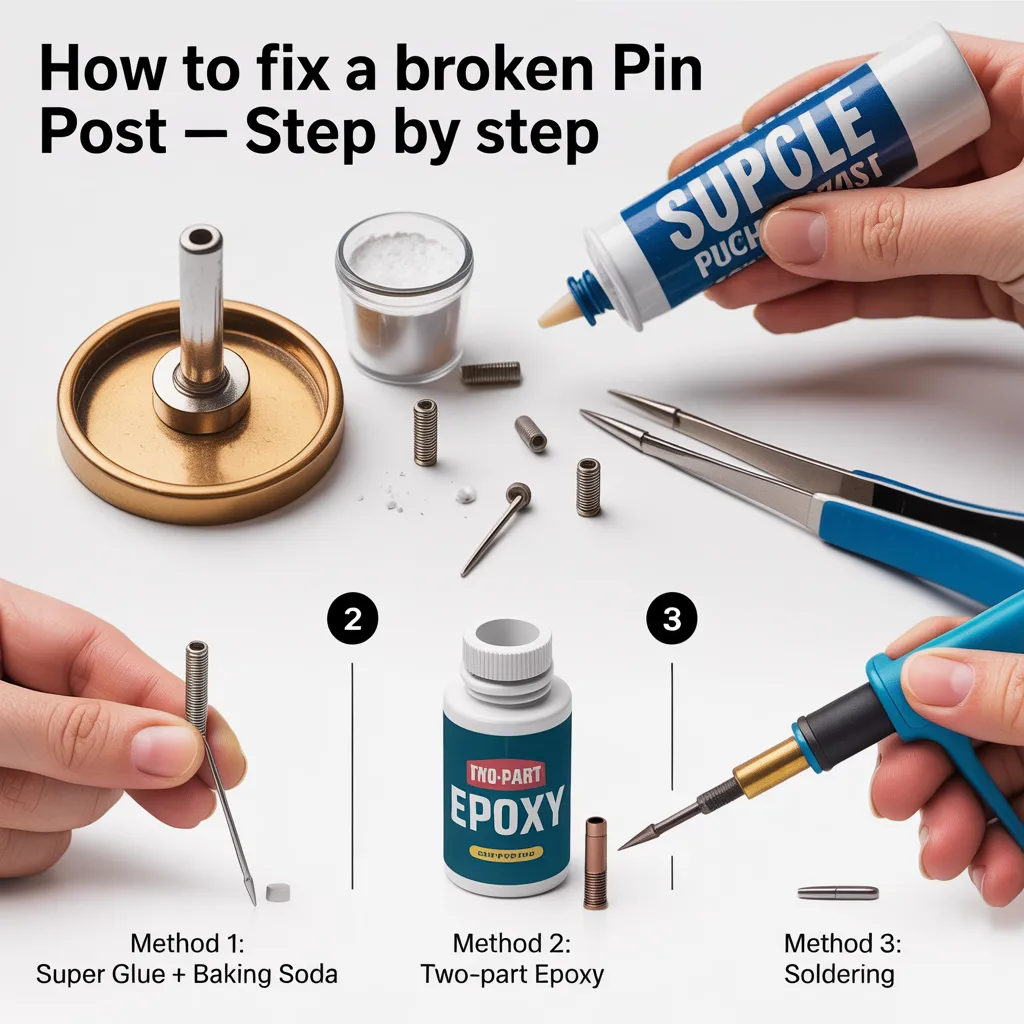
This is the big one. A snapped or missing post renders a pin unwearable, but it doesn’t have to mean the bin. Here’s how to fix a broken pin using three progressively advanced methods:
Method 1 — Super Glue + Baking Soda (Best for Quick Fixes)
This is the fastest and most accessible method, great for individual pins or small batches.
What you need: Cyanoacrylate (super glue) gel, baking soda, a replacement post (if the original is missing), tweezers.
- Clean the contact area on the back of the pin with a dry cloth.
- Position the replacement post using tweezers.
- Apply a small drop of gel-based super glue to the base of the post.
- Sprinkle a tiny pinch of baking soda onto the glue — this triggers an instant cure reaction, creating an extremely strong bond.
- Blow off excess baking soda and allow 5–10 minutes to fully set.
Pro tip: For acrylic pins, always use acrylic-safe super glue — standard formulas can turn the clear material cloudy.
Method 2 — Two-Part Epoxy (Best for Long-Term Durability)
If you’re repairing higher-value pins or want the most durable result, two-part epoxy adhesive is your go-to. It consists of a resin and hardener that are mixed in equal parts before application.
- Mix a small amount of resin and hardener on a disposable surface.
- Apply to the pin post contact area with a toothpick for precision.
- Hold or clamp in place while it sets (typically 5 minutes for initial cure, 24 hours for full strength).
- Epoxy is ideal for metal-to-metal bonding and resists moisture, making it a strong choice for wearable pins.
Method 3 — Soldering (For Advanced Users and High-Value Pieces Only)
Soldering can produce the strongest metal bond — but it comes with important caveats. Applying heat post-production will damage enamel color fill and metal plating. This method should only be considered for bare metal pins without surface finish, or by experienced technicians using controlled heat. For most business repair scenarios, Methods 1 and 2 are more appropriate.
How to Fix a Bent Pin Post

This is actually the easiest fix of all. A bent post doesn’t mean the pin is ruined — it just needs gentle persuasion back into shape.
- Use a pair of fine needle-nose pliers.
- Grip the post near its base and apply slow, gradual pressure to straighten it.
- Work in small increments — bending too quickly can snap the post entirely.
- Once straight, test that it passes through a clutch smoothly before shipping or displaying.
If a post snaps during straightening, move on to the broken post repair methods above.
How to Fix an Enamel Pin with Surface Damage
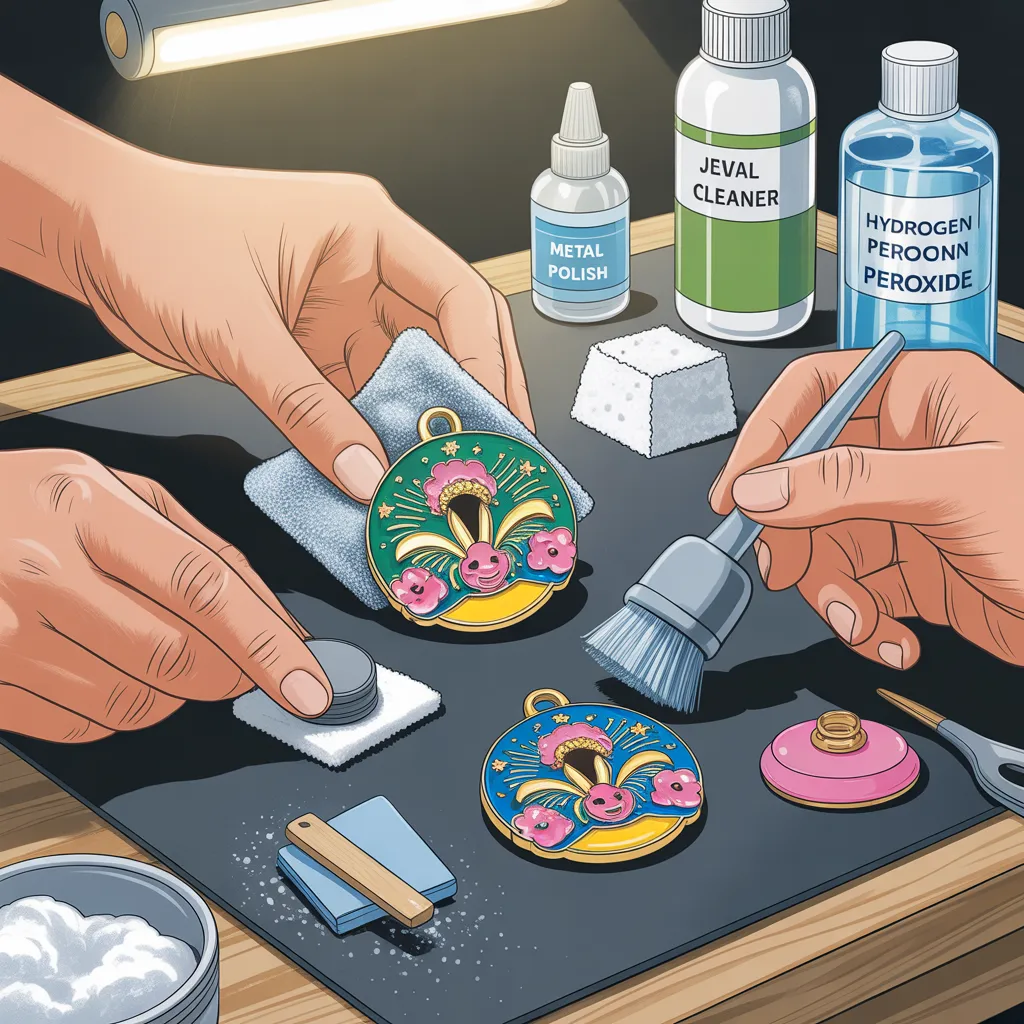
Surface issues are the most common maintenance challenge for retailers holding inventory over time. Here’s how to address each type:
Light Scratches
Apply a small amount of car polish or metal polishing compound to a microfiber cloth. Buff the pin surface using small circular motions — alternating clockwise and counterclockwise. Don’t press too hard; light, consistent pressure is key. Toothpaste works as a budget-friendly alternative for soft scratches on hard enamel surfaces. Always test on the back of the pin first.
Tarnish, Oxidation, and Rust
Use a liquid jewelry cleaner and a soft-bristled brush. Always spot-test on the back of the pin before applying to the front — some cleaners can react with certain plating finishes. For stubborn tarnish on bulk inventory stored long-term, a solution of diluted ammonia and water can be effective. Work in a ventilated area and rinse thoroughly. Never use vinegar or harsh household chemicals — they will permanently damage both the metal and the enamel.
Yellowing and Discoloration
This is common with older stock or pins stored in warm, humid conditions. Mix a paste of hydrogen peroxide (30 volume), baking soda, and an oxi-action cleaning agent. Apply gently with a soft toothbrush, wrap the pin in plastic wrap, and place it under direct sunlight or a UV light for up to 8 hours. This method works well on hard enamel and sandblast enamel pin surfaces.
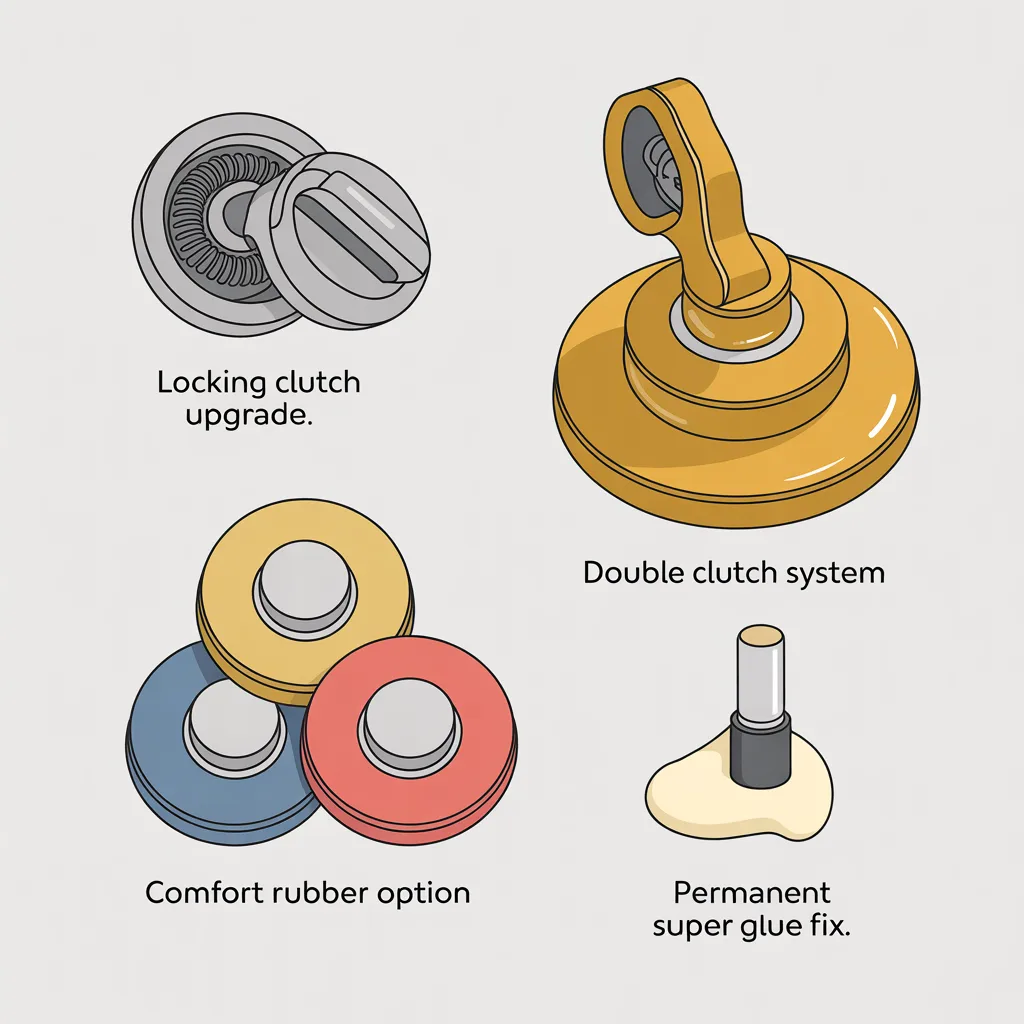
How to Keep Pins from Falling Off
Prevention is always better than repair. One of the most frequent complaints from end customers is pins falling off — so understanding how to keep pins from falling off is directly tied to your brand’s reputation.
Upgrade to Locking Clutches
The standard butterfly clutch (also called a military clutch) is the default for most pins, but it offers only moderate grip. Locking clutches — sometimes called deluxe clutches — use a more complex internal mechanism that grips the post firmly and releases only when squeezed intentionally. They’re a worthwhile upgrade for premium product lines.
Go Double Clutch
For pins with two posts (a popular configuration for larger pins), double clutches dramatically reduce movement and the chance of accidental loss. Recommend this setup to your customers for high-traffic wear scenarios like trade show lanyards or jackets.
Use Rubber Clutches for Comfort-First Applications
Rubber clutches are softer and more comfortable against skin, making them ideal for shirt collar or lapel placement. They do wear faster than metal clutches, so educate your customers to replace them when they become loose.
Super Glue as a Permanent Fix
If a customer wants to permanently attach a pin to a specific garment or accessory, a dab of super glue applied to the post before securing the clutch creates an almost irreversible bond. This is a useful tip to include in product packaging inserts — but always note that it cannot be undone without risking fabric damage.
Preventive Maintenance Tips for Bulk Pin Inventory
For traders, brands, and retail buyers managing large quantities of pins, prevention is the most cost-effective strategy. Here’s how to protect your inventory before problems arise:
- Inspect on arrival: Check every order as soon as it lands. Document any transit damage immediately — delays make claims harder to resolve.
- Store by material type: Keep soft enamel separate from hard enamel; store gold-finished pins away from silver-finished ones to prevent tarnishing from cross-metal contact.
- Avoid wooden surfaces: Treated wood contains chemicals that can stain or tarnish metal pins. Use felt-lined trays or boxes instead.
- Control humidity: Use silica gel packs or a dehumidifier in your storage area — especially in summer months when tarnishing accelerates.
- Clean regularly: A quick wipe with a soft microfiber cloth at the end of each display day prevents dirt and moisture buildup.
- Rotate display stock: Overexposure to light and heat causes fading and discoloration. Rotate display pins with storage stock every few weeks.
- Wax for long-term storage: Applying a thin coat of jewelry wax to hard enamel and sandblast enamel pin surfaces creates a barrier against oxidation, keeping them showroom-fresh for longer.
DIY vs. Professional Repair
Most lapel pin repairs are well within DIY territory. But there are situations where professional help makes more sense:
- DIY is appropriate for: bent posts, loose clutches, light surface scratches, basic cleaning, and re-gluing broken posts.
- Go professional when: the pin has complex mechanical components, intricate gemstone or multi-part construction, or when you have a large batch of valuable branded pieces that all need the same repair.
Local jewelry repair shops, the original pin manufacturer, or specialist online mail-in repair services are all good options. If the damaged pins are still under order warranty, contact your manufacturer first — many will replace or repair within a reasonable window.
Protect Your Pin Investment
A damaged lapel pin doesn’t have to be a write-off. With the right knowledge and a small repair kit — some gel super glue, two-part epoxy, a set of needle-nose pliers, microfiber cloths, and an upgrade to locking clutches — you can handle the most common issues in-house and keep your inventory, and your customers, in great shape.
The best long-term strategy, of course, is to start with quality. Pins manufactured with precision — using proper post-attachment methods, quality plating, and durable enamel — require far fewer repairs in the first place. At Unique Custom Pins, we design every pin with durability and wearability in mind, so you can focus on growing your brand, not fixing your stock.
Ready to order pins that are built to last? Get in touch with our team at Uniquecustompins for a custom quote.
FAQs
Can you really fix a lapel pin with a broken post at home?
Yes — and it’s easier than most people expect. The most reliable DIY method is re-gluing with two-part epoxy or super glue gel plus baking soda. While the original factory method (soldering or welding) can’t be safely replicated post-production, a good adhesive bond is strong enough for normal daily wear.
What’s the best glue for lapel pin repair?
Two-part epoxy offers the best long-term strength and is moisture-resistant. For quick field fixes, cyanoacrylate (super glue) gel plus baking soda creates a nearly instant, very strong bond. Jewelry-specific adhesives work well for delicate finishes. Avoid standard craft glue — it’s not durable enough for metal-to-metal contact.
Why does my lapel pin keep falling off?
Almost always a clutch issue. Rubber clutches degrade over time, and even metal butterfly clutches lose grip if misaligned during use. Upgrading to a locking clutch is the single most effective fix for pins that won’t stay put.
Is a sandblast enamel pin harder to maintain than standard enamel pins?
Not significantly — but its matte, porous surface means you should avoid abrasive polishes and harsh chemicals. Gentle cleaning with a soft cloth and mild soap keeps a sandblast enamel pin looking its best. For storage, waxing is particularly beneficial as it seals the textured surface.